Easy DIY Nursery Decor
Nine months of pregnancy seems like a long time, but actually flies by when you're waiting for your bundle of joy to arrive. Within that seemingly short time frame, there are a lot of things to consider: taking care of the baby inside and outside of the womb, taking care of yourself during and after the pregnancy, collecting all of the gear needed to help this little one survive, and among it all, financially affording this new adventure.
Justin and I really wanted to go all out stocking up on supplies and building Evie's nursery, but that's easier said than done when you are financially preparing for a baby plus paying off a huge student loan.
The theme of our nursery was PINK and GOLD. Everything and anything was some shade of pink or gold which made it really easy because we didn't have to match specific hues or anything. If it was pink or gold, it belonged in her room.
We were able to do a few easy DIY projects that really made the nursery stand out and gave it the perfect finishing touch.
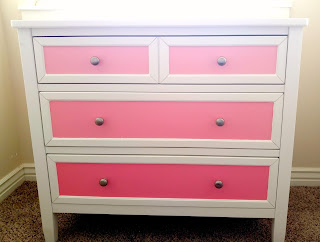
Simple DIY Baby Dresser

We purchased a standard white dresser from Walmart that fit within our budget - nothing all that special. After building the dresser and ensuring we had all the parts, we took to giving it some life and color. I bought 3 cans of paint: Pink (as shown on the bottom drawer), white, and navy blue. I taped off the edges of the drawers to keep my paint strokes in line and then got to work, adding white to the can of paint as I moved on to each ascending drawer to give it the ombre look.
This project took awhile only because each drawer has 3-5 coats of paint. The inexpensive brushes I used left the drawers with streaks, which meant I had to be more diligent in adding thin layers often to help cover them up.
Be prepared that some of the inexpensive tools mean you'll be putting more work into the actual project, but it might be worth it depending on how much you save. It was worth it to us :)
Quick & Easy DIY Diaper Station Table

We decided to use the top of Evie's dresser as her diaper changing station, but pretty soon realized that this created an issue of where to keep her diapers, wipes, diaper rash cream, baby lotion, and other odds and ends you need when changing a diaper.
I received a cute diaper caddy for my baby shower, but had it sitting on the floor next to the dresser. Definitely not convenient for those dreaded, yet unavoidable, blowouts we're sure to face when we'll need quick access to all of the diaper supplies. So we made a diaper station table to hold her supplies in a more accessible place.
This project was very simple and actually very inexpensive. We found the two end tables at a local yard sale in Vernal for $3 each. Talk about a deal! I used the white paint we'd already purchased for the dresser to paint the entire structure white. Well, Justin painted it so I could avoid the fumes. I spent less than $10 at JoAnn's where I purchased the pink fabric quarter as well as batting to give the table a padded feel.
Once the table was painted and dry, I laid the table upside down on the fabric and used pushpins to secure it around 3 of the 4 edges. I stuffed the tabletop with padding and then finished pinning the last side of fabric to the table.
The idea was that when Evie outgrows diapers, I could unpin the fabric and replace it with another fabric - either more grown up or fabric meant for a boy for our next child. Unfortunately the pins proved harder to push in on these particular tables and I don't think I'll be able to get them out without ruining the wood of the table.
It's worth it because the tables were so inexpensive, but isn't as versatile as I hoped.
The Letter 'E'
I received both of these 'E's' as gifts from a baby shower that a friend in my ward threw for me. She found the letter blocks at a thrift store and used them as decorations during the shower. They were so cute - and colored perfectly - that Justin and I set them up in Evie's nursery.

The gold 'E' is a simple letter cut from Styrofoam and spray painted gold. Easy peasy, right?

The wooden 'E' included a bit more work, but still pretty simple to make. My friend found a plaque just slightly larger than the wooden 'E' and the letter at a thrift store, but you could also find these at any local craft store like Michael's, JoAnn's, or even Hobby Lobby. Simply tape off your stripes on the wooden plaque and paint! Paint the 'E' a solid color and then hot glue to the plaque once both pieces have dried thoroughly.
Quick & Easy DIY Diaper Station Table

We decided to use the top of Evie's dresser as her diaper changing station, but pretty soon realized that this created an issue of where to keep her diapers, wipes, diaper rash cream, baby lotion, and other odds and ends you need when changing a diaper.
I received a cute diaper caddy for my baby shower, but had it sitting on the floor next to the dresser. Definitely not convenient for those dreaded, yet unavoidable, blowouts we're sure to face when we'll need quick access to all of the diaper supplies. So we made a diaper station table to hold her supplies in a more accessible place.
 |
| Before (Left). After (Right) |
Once the table was painted and dry, I laid the table upside down on the fabric and used pushpins to secure it around 3 of the 4 edges. I stuffed the tabletop with padding and then finished pinning the last side of fabric to the table.
The idea was that when Evie outgrows diapers, I could unpin the fabric and replace it with another fabric - either more grown up or fabric meant for a boy for our next child. Unfortunately the pins proved harder to push in on these particular tables and I don't think I'll be able to get them out without ruining the wood of the table.
It's worth it because the tables were so inexpensive, but isn't as versatile as I hoped.
The Letter 'E'
I received both of these 'E's' as gifts from a baby shower that a friend in my ward threw for me. She found the letter blocks at a thrift store and used them as decorations during the shower. They were so cute - and colored perfectly - that Justin and I set them up in Evie's nursery.

The gold 'E' is a simple letter cut from Styrofoam and spray painted gold. Easy peasy, right?

The wooden 'E' included a bit more work, but still pretty simple to make. My friend found a plaque just slightly larger than the wooden 'E' and the letter at a thrift store, but you could also find these at any local craft store like Michael's, JoAnn's, or even Hobby Lobby. Simply tape off your stripes on the wooden plaque and paint! Paint the 'E' a solid color and then hot glue to the plaque once both pieces have dried thoroughly.
I Love to See the Temple
I actually made this temple plaque years ago when I was in Young Women's. I love the fact that I can reuse decorations that meant a lot to me as a teenager/child and have them in my baby girl's room.
All you need to make your own temple plaque is a wooden board with raised sections, a photo of your favorite temple, and clear lacquer as a wood finish.
First, paint the entire wooden board whatever color you'd like. I used white, but you can easily paint it any color to match the theme of your room or the photo you are pasting onto it.
Second, cut your photo of the temple into equal sized pieces measured to fit the raised sections of your specific wooden board. Use Elmer's glue to secure the photo pieces in place once the board is dry.
Third, set your board on an upside down paper cup so it is lifted off of the table. Pour lacquer onto your piece, letting it drip off the edges. Make sure the lacquer spreads smoothly across your piece, using a paint brush to clean up drips as needed. Leave your piece in this position until completely dry.
Professional DIY Name Sign

This project is for those who are a bit more adventurous than me! My sister is an artist and made these cute name blocks to hang in Evie's room (she designed her own font and everything)! It really brought the whole room together. She walked me through how she made it so if any of you are interested in giving it a try, have at it!
First, take a font into Adobe Illustrator (AI) and manipulate it to look the way you'd like. For this step, you will need to already have a working knowledge of AI because I do not. Afterwards, laser cut your letters from the Adobe Illustrator file onto poplar board.
Once your letters are designed and cut, place each block backwards onto the back of your chosen colored paper. For Evie's name we obviously used gold glitter paper. Cut them out using scissors and an exact-o knife.
Once all of your letters are cut to size, use Liquitex Gloss Medium and paint the front side of the poplar board, laying the corresponding paper on top of the gloss. You need to hold it firm until it is mostly dry to avoid bubbling or having the edges peel away from the board. Once it's dry, trim any remaining paper from the edges of the board using an exact-o knife or sandpaper.
And your letters are done! Kristy went an extra step and nailed hangers onto the back side of each letter so that they would hang easily on Evie's wall. If you plan to hang your name blocks, make sure to design the font and size width large enough that at least the smallest sized hangers will fit.
 |
| Mount Timpanogos Temple |
All you need to make your own temple plaque is a wooden board with raised sections, a photo of your favorite temple, and clear lacquer as a wood finish.
First, paint the entire wooden board whatever color you'd like. I used white, but you can easily paint it any color to match the theme of your room or the photo you are pasting onto it.
Second, cut your photo of the temple into equal sized pieces measured to fit the raised sections of your specific wooden board. Use Elmer's glue to secure the photo pieces in place once the board is dry.
Third, set your board on an upside down paper cup so it is lifted off of the table. Pour lacquer onto your piece, letting it drip off the edges. Make sure the lacquer spreads smoothly across your piece, using a paint brush to clean up drips as needed. Leave your piece in this position until completely dry.
Professional DIY Name Sign

This project is for those who are a bit more adventurous than me! My sister is an artist and made these cute name blocks to hang in Evie's room (she designed her own font and everything)! It really brought the whole room together. She walked me through how she made it so if any of you are interested in giving it a try, have at it!
First, take a font into Adobe Illustrator (AI) and manipulate it to look the way you'd like. For this step, you will need to already have a working knowledge of AI because I do not. Afterwards, laser cut your letters from the Adobe Illustrator file onto poplar board.
Once your letters are designed and cut, place each block backwards onto the back of your chosen colored paper. For Evie's name we obviously used gold glitter paper. Cut them out using scissors and an exact-o knife.
Once all of your letters are cut to size, use Liquitex Gloss Medium and paint the front side of the poplar board, laying the corresponding paper on top of the gloss. You need to hold it firm until it is mostly dry to avoid bubbling or having the edges peel away from the board. Once it's dry, trim any remaining paper from the edges of the board using an exact-o knife or sandpaper.
And your letters are done! Kristy went an extra step and nailed hangers onto the back side of each letter so that they would hang easily on Evie's wall. If you plan to hang your name blocks, make sure to design the font and size width large enough that at least the smallest sized hangers will fit.
The best part about all of these projects is they are so versatile whether you are having a boy or girl. Just change out the colors you're using.
What DIY projects have you been working on that have saved you money?
What DIY projects have you been working on that have saved you money?

Comments
Post a Comment